Getting Started with the Cisco Meraki Dashboard API
What can the Meraki API bring to the management of your wireless and network devices? Let’s find out.


Discover how CDW can assist you with your network infrastructure management needs.
Out of the box, Meraki has a very intuitive dashboard to manage all your devices. But the real power of Meraki comes in the form of its API library.
There are currently over 300 available API functions. Therefore, it’s a safe bet that the automation you seek is available. The API utilizes the easy-to-use REST platform and responds with JavaScript Object Notation (JSON) for easy parsing.
Whether you have some programming experience or none, you’ll see how easy it is to build a solution with the Meraki APIs. For this blog, we’ll use Python as our programming language of choice since it is probably one of the easiest languages to learn, but any language supporting REST calls will suffice.
Here are just a few of the things one can do with the Meraki API:
- Manage all organizations, devices, networks and users
- Create a provisioning tool to configure and deploy multiple devices or networks in a very short time
- Provision remote workers automatically
- Create your own dashboard for any unique use case so that the admin only sees what they need to see
- Automatically collect analytics and send to the appropriate people
These are just a few examples ― try to think of automating something with the Meraki API that is somewhat simple to begin and useful to you ― who knows where it will lead you.
Starting with Cisco Meraki Dashboard API
For starters, review the Meraki Developer Hub, especially the Cisco Meraki 101 page where it explains the platform and how to interact with it via the API. There are also some sample Python scripts at this site to help get you started down the path of network automation.
After familiarizing yourself with the platform and its capabilities, check out the extensive list of API calls available online. Here is an example of how to retrieve the organizations (there is a demo account option so you can test the APIs without entering any information).

You can also test the API calls by entering in your Meraki instance information. If you don’t currently have a Meraki deployment and wish to test the waters, Cisco provides a Sandbox environment located here.
Start Using the API
Now that you are familiar with some capabilities, it’s time to dive in and try using the API. Whenever I start using a new API, I always try it out with an application called Postman. Postman is a great API test tool that helps you get familiar with the API parameters, URL structure and authentication required. Postman also has some great features such as collections, environment variables and a code generator.
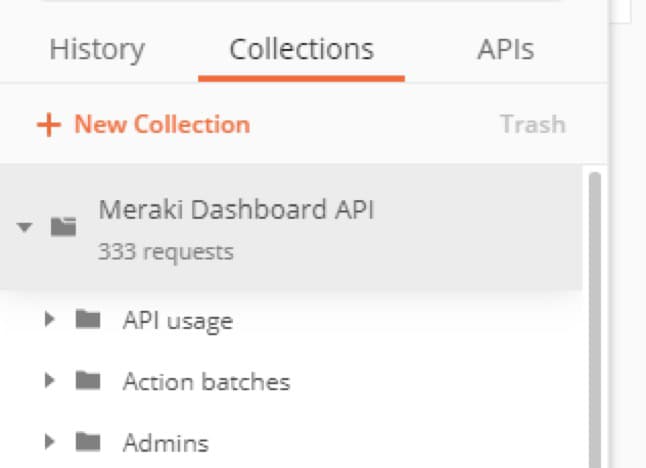
Collections are very useful, containing all the API functions available, and they can typically be added to Postman by either downloading a collection from the internet or adding it via a link on a web page. Meraki makes this super easy by providing a button link on their web page. It can be found here. Ensure Postman is installed, then click the “Run in Postman” button in the top right corner of the Meraki API web page.

This will automatically add all API function calls to your instance of Postman:
Once the collection is added, create an environment for Meraki by clicking on the settings wheel in the top right corner of Postman.

Click “Add,” then create the following variables:
- baseUrl
- X-Cisco-Meraki-API-Key
- networkId
- serial
- organizationId
Set the baseUrl to https://api.meraki.com/api/v0 and copy and paste in your Meraki API key. The Meraki API key can be found in the Meraki Dashboard under the “My Profile” link in your username dropdown menu (located in the upper right corner of the Meraki dashboard).
Your environment should look something like this:
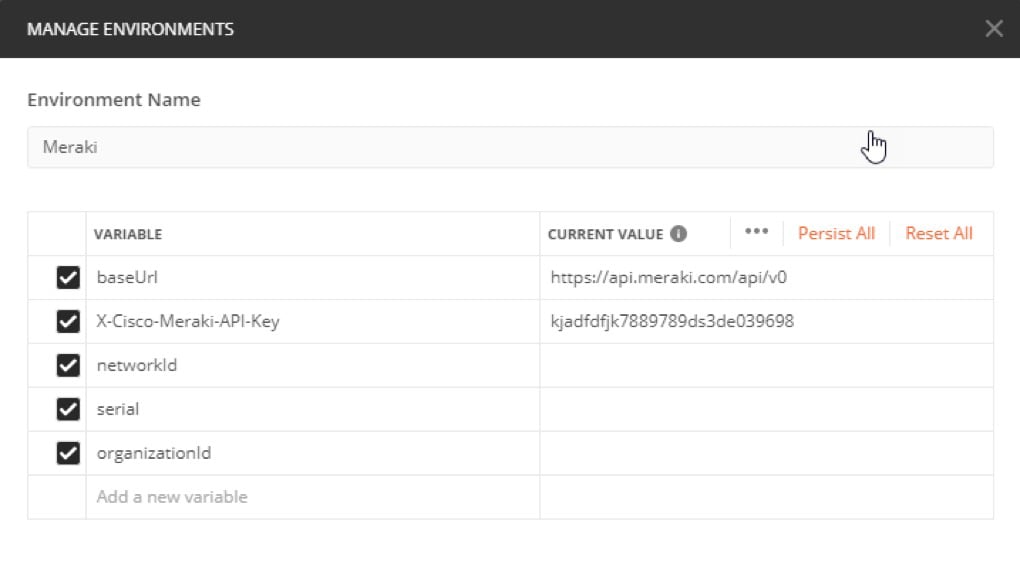
Save the environment as “Meraki” and choose it from the drop down menu in the top right corner of Postman.

You are now ready to execute some APIs. Let’s look at an example of how to get the status and hardware details of an access point or any other device. First, we’ll need to call a few APIs to fill in the remainder of our environment variables.
Within the list of collections, start with Organizations-> getOrganizations. You’ll notice this is a “Get” function and the baseUrl is shown as an environment variable. This will insert the value from the environment variable just created. Click “Send.” The response will display the organization ID as well as a URL with a different prefix than “api” in front of “meraki.com.” Note what this value is. Next, update the environment variables by copying the response “ID” value to the clipboard, clicking on the settings wheel in the top right corner, and then clicking on “Meraki” to edit. Copy the organization ID into the “organizationId” current value column and then update the baseUrl to be xxx.meraki.com where “xxx” is the prefix from the “URL” response parameter. Click “Update.”
Now run Organizations->getOrganizationDeviceStatuses. This will return all devices within the organization and their current status along with other information we can use to update the environment variables. Note the “serial” value of the specific device you are interested in and note the “networkId” value. Update the environment variables “serial” and “networkId” with this data.
We are now ready to get detailed information about our device. Within the list of Collections, go to Devices->getNetworkDevice. Within this URL, the “:networkId” and “:serial” parameters will get populated from the values just added to the environment. Click “Send” and the response should show information such as model and firmware.
Getting familiar with the API in Postman is a great way to get started, but the power of the API comes to light when writing your own scripts that perform a specific function. A feature within Postman gives you a head start by providing a source code generator. In our example, let’s generate some Python code that returns the detailed information about an access point from the “getNetworkDevice” API.
Click on “Code” on the right side of the Postman window:

In this example, we’ll select “Python->Requests” (Requests is a Python package for executing API calls via https or http). Copy the code into your favorite development tool, i.e., PyCharm or VS Code and run the code. (See my previous post How to Get Started with Python Programming Language for more information on working with this language).
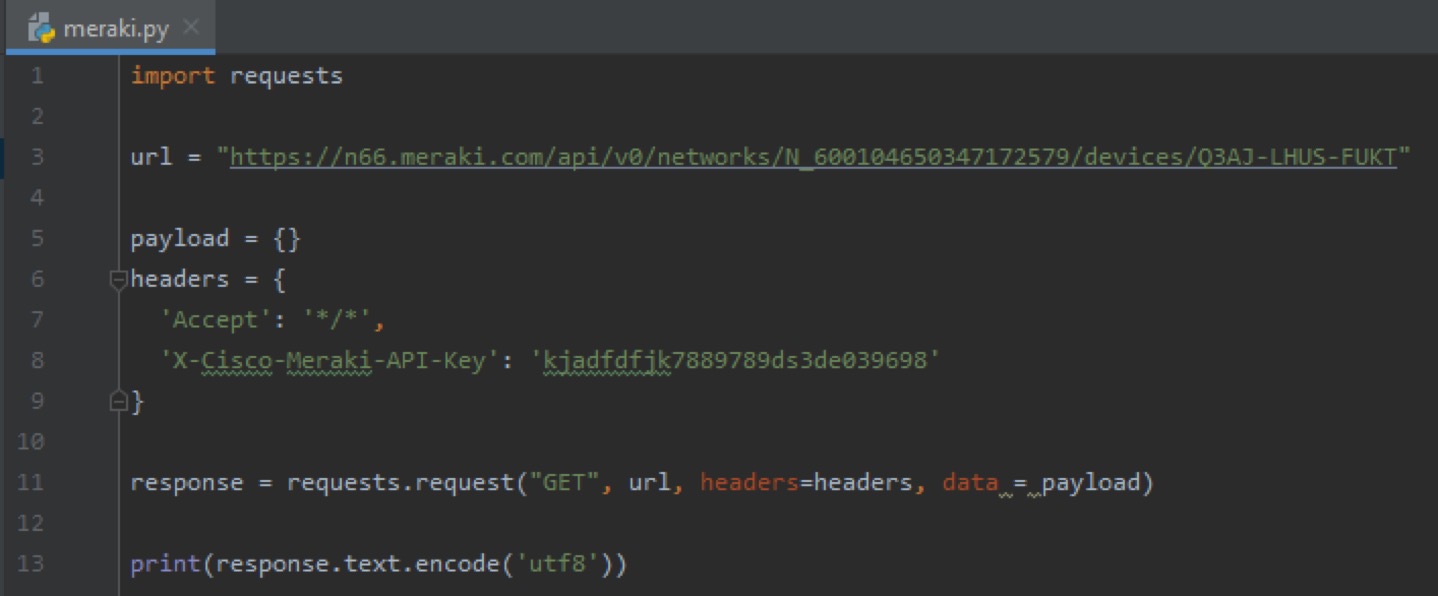

The code generator from Postman did not require any modifications and, as shown in the above screen shot, returned the data for the access point.
Wrap-Up
Now that you have seen how simple it is to get started using the Meraki API, it’s time to build something useful. Perhaps it’s an automated report generator or a frequent camera snapshot to be delivered to your inbox. There are so many things you can do with the Meraki Dashboard API; the possibilities are endless. Happy coding.
Next Steps
Are you interested in learning more about how Cisco Meraki can improve your environment, or do you wish to discuss potential use cases for automation with the Meraki Dashboard API? Please contact your CDW account manager to learn more.