Are You Taking the Right Approach to Backup and Recovery? — Part 4
Configuring Veritas Backup Exec to use Microsoft Azure storage ensures greater data safety and reduces costs.


You’ve read through Part 3 of my backup and recovery series and decided that cloud backups are the right thing to do. What do you do next? First, you will need an Azure subscription that has access to create a Storage account. This can be obtained a couple different ways, the easiest of which is to purchase CDW Cloud Storage Powered by Azure for Veritas Backup Exec. Next, you will need to have a Backup Exec 16 installed and configured on a local media server. If you are already running the latest Backup Exec, jump to the next section; otherwise, check out these resources for installing or upgrading Backup Exec:
- “Best Practices for Preparing to Install or Upgrade Backup Exec“
- “About Upgrading from Previous Versions of Backup Exec to Backup Exec 16“
- “Backup Exec System Requirements“
Creating an Azure Storage Account
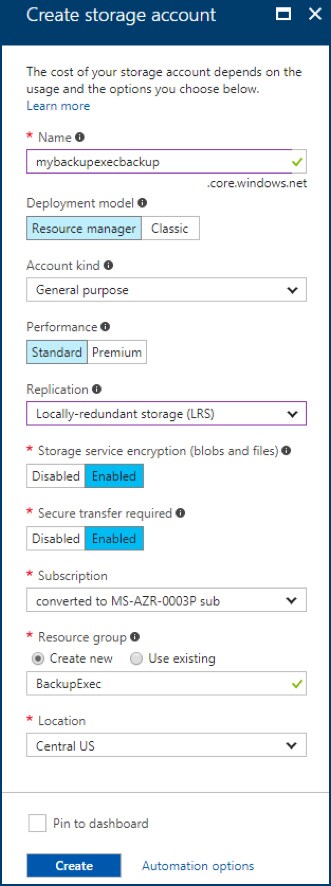
Now that we have that out of the way, let’s get started with Azure. It is much easier than it looks. We first need to create a new Storage account that is dedicated to use with Backup Exec. This will help keep track of usage and costs, not to mention being able to restrict other people from getting access to your backup data.
- Log into your Azure Subscription at https://portal.azure.com.
- Go to Storage Accounts — you may have search for it.
- In the far top-left corner, click Add.
- Name it with an easy-to-understand name.
- Set Replication to locally redundant storage (LRS), unless you would like to replicate the data.
- Enable Storage service encryption.
- Enable secure transfer required.
- For Resource Group, use an existing resource group or create a new one.
- For Location, pick the region that is closest to where the majority of data will be sent from. (This map will help.)
- Click Create; it will take a couple minutes to complete.
- You’re done!
Using the Backup Exec Connector
With Backup Exec all set and the Azure Storage created, now is the time to configure the connector between Backup Exec and Azure. This allows Azure Storage to be used with Backup Jobs. These links walk through the steps needed to properly configure the Cloud Connector:
- “How to Configure the Backup Exec Cloud Connector for Microsoft Azure“
- “Configuring Azure Targets in Backup Exec 16” (video without audio)
Configuring Backup Jobs to Use Azure
There are a couple different ways to approach integrating Azure into your backup scheme. From previous blog posts, we discussed identifying the data that would be sent to the cloud. This may already be part of an existing backup job or a new one, depending on your requirements. For this example, let’s assume we are using our existing Weekly Full backup job that runs every Friday night. This is the easiest way to integrate Azure, since it requires adding a new stage to the existing backup job.
Once the Azure Storage has been added, configure the amount of time the data should be kept for, then disable compression and encryption. Also, change Verify to “Do not verify data for this job.” This will reduce the time for the job to run and save on Azure egress traffic. Since the Azure backup stage will be using the local disk-based backup, make sure Verify is enabled only for the local disk stage. The Veritas article, “Best Practices for Backup Exec 16 Backups,” offers additional tips for configuring and administering Backup Exec.
For a limited time, CDW Cloud Storage Powered by Azure for Veritas Backup Exec includes valuable deployment services to complete the configuration steps explained in this blog post. Whether you’re implementing new backup infrastructure or testing cloud backups in a hybrid scenario, let CDW help you get started, risk-free.
When starting with cloud backups, it is recommended to start with a smaller backup job, either an existing job or a new job with only the data that needs to be sent offsite. The initial backups will take a longer amount of time to upload data to Azure. These initial jobs will provide you the time needed to complete a backup job.
Once the initial jobs have run for a couple weeks, then start to add more data or more jobs in small increments. This will ensure that there is enough time between jobs for the backups to complete. It will also help avoid any surprise costs. It’s also important to keep an eye on the Azure usage — it is easier to identify cost issues with smaller jobs. As more jobs are run and data is archived, expect to see a steady growth in Azure Storage usage while the put operations will grow more slowly and should level after a month.
Following these steps will get you to using Azure as your offsite storage, help protect your data and reduce storage costs.
Learn more about how CDW can assist with your backup and storage needs.